Using the Waiver Request Workflow
The waiver request workflow involves the following steps:
-
A patron requests a waiver for one of their fines.
-
An authorized staff member submits a waiver request using the Waiver Request form.
To access the Waiver Request form, you need Fines: Submit waiver requests permission.
-
Overseeing staff approves or declines the waiver request.
To approve a waiver request, you need the Fines: Approve waiver requests for user threshold permission. To decline a waiver request, you need the Fines: Decline waiver requests permission.
When you approve or decline a waiver request, the following happens:
-
Approved — the amount requested is waived and removed from the patron's account.
-
Declined — the charge remains on the patron account.
-
Submit a Waiver Request
To submit a waiver request
-
Use the Find Tool to find the patron who wants a waiver.
-
To open the patron record workform, double-click the patron in the search results.
The patron record workform appears. -
Select the Account view.
-
Select the check box beside the charges you want to waive.
-
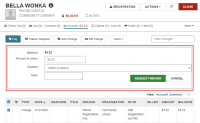
Select Waiver Request.
The area below the buttons expands to show the Waiver Request Form. -
Fill in the form information:
-
(Optional) Change the Amount to waive. By default, Leap lists the entire amount of the charge.
-
Select a Reason.
-
(Optional) Enter a Note.
-
-
Select REQUEST WAIVER.
The Waiver column appears in the patron's account table. This column has a check mark in it if there is a pending waiver request for the charge.Note:
When a waiver request is in progress, Leap doesn't allow:A staff member to start a new waiver request.
A patron to pay the fee in question.
The waiver request moves to the Approval Dashboard.
Approve or Decline a Waiver Request
To approve or decline a waiver request
-
To open the Approval Dashboard, go to Utilities > Approval Dashboard.
The Weeding Requests tab of the dashboard appears.
-
Select Waiver Requests.
The Waiver Requests tab of the dashboard appears in the Active Requests view.
-
(Optional)Filter or sort the list of waiver requests.
-
To filter by keyword, type a keyword in the Filter box.
-
To sort the list, select a column header.
-
-
Select the checkbox beside the waiver request you want to approve or decline.
Leap enables the REVIEW button.
-
Select REVIEW.
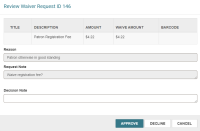
The Review Waiver Request ID dialog opens.
-
Review the waiver request information.
-
(Optional) Enter an explanation in the Decision Note field.
-
Select one of the following:
-
APPROVE– Select this option to approve the waiver request. The waiver request is set to a status of Approved, and Leap removes the charge from the patron's account.
-
DECLINE – Select this option to leave the charge on the patron's account. The waiver request is set to a status of Declined.
-


