Outreach Services Bulk Actions
The Outreach Services Manager provides a method to manage selection lists for patrons based on preferences that are set up for them. Patrons can also select items that they want to borrow through the normal request process.
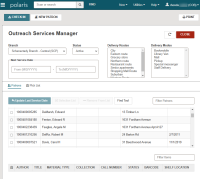
Use the Outreach Services Manager to process items for multiple outreach services patrons, identify the patrons who are due for outreach services, create pick lists of items for patrons, and process the items from the combined pick list.
To perform outreach services for a patron, the Outreach Enabled setting must be selected in the patron record. For more information, see Outreach Services (ORS).
This section covers the following topics:
- Access the Outreach Services Manager
- Add a Patron to the Outreach Services Manager
- View an Individual Patron's Account
- View an Individual Patron's Pick List and Selection List
- Add held items to pick lists
- Remove items from pick lists
- Sort pick lists
- Place holds
- Check out items
- Print receipts
- Add patrons or items to a new or existing record set
For more information, see Managing Record Sets.
Access the Outreach Services Manager
To access the Outreach Services Manager
- From the Utilities menu, select Outreach Services.
Add a Patron to the Outreach Services Manager
You can use the Find Tool to add patrons to the Outreach Services Manager. For more information, see Using the Find Tool.
To add a patron to the Outreach Services Manager
- On the Patrons view, select the Find Tool.
- Enter search criteria.
- Select the patron you want to add.
- Select Open.
By default, the system filters the results to include only Outreach Services and nonsecured patrons.
Leap lists patrons that match your search criteria as you type.
View an Individual Patron's Account
To view an individual patron's account
- On the Patrons view, select a patron from the list.
View an Individual Patron's Pick list and Selection List
To view an individual patron's pick list and selection list
-
On the Outreach Services Manager workform, select from the following filters to narrow the list of patrons that appear on the Patrons view:
- Branch
- Status
- Next service date (range)
- Delivery routes
- Delivery modes
Note:
You can select more than one delivery route or delivery mode. Use Ctrl + click to select multiple options. You can also multiselect using a touchscreen. - Select the checkbox next to a patron's name.
- Do one or more of the following:
- To view a patron's selection list, select Selection List.
- To remove a patron from the Patrons view, select Remove from List.
The Outreach Services Manager workform updates automatically as you select the filtering options.
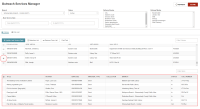
The patron's pick list opens below the patron list.
Perform Bulk Outreach Operations
You can perform the following outreach operations for multiple patrons at once:
- Check out items
- Place holds
- Add held items
- Delete items
To perform bulk outreach operations
- On the Outreach Services workform, select Pick List.
- Do one or more of the following:
- To sort the list, select the column that you want to sort by.
- To remove items from the list, select Remove From List.
- To add items to the list, select Find Tool and search for the items you want.
- As you pick items on the list, select the checkbox next to the patron's name.
- To place a hold on an item, do the following:
- Select an item.
- Select Place Hold.
- If necessary, modify the date range and the pickup location, and then select OK.
- To check for items that might be on hold for the selected patrons at the currently selected branch, select Add Held Items.
- Select Check Out.
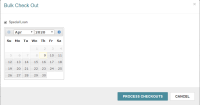
- (Optional) If you want to set a special due date for the items, select Special Loan, and then select a due date.
- Select PROCESS CHECKOUTS.
- If a patron is blocked, a warning message appears. You can either continue the checkout or cancel.
- If an item is blocked, a warning message appears. You can either continue the checkout, cancel, or view the item record.
- If the library requires a fee to check out an item the Patron Check-out Charge window appears. You can pay the charge, wave the charge, charge the patron's account, or cancel.
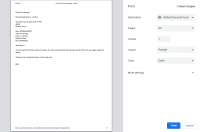
- If you want to print the receipts, select Print. Otherwise, select Cancel.
A flag in the second column indicates the item is on hold for the patron.
The Bulk Check Out window opens.
The system displays the checkout receipts for each patron. Receipts only appear if the feature is enabled in the staff member's Leap settings.
Add Patrons or Items to a New or Existing Record Set
To add patrons or items to a new record set
- On the Pick List view, select the patrons or items that you want to add to a record set.
- From the Actions list, select one of the following:
- Add to New Patron Record Set
- Add to New Item Record Set
-
Enter a name for the record set in the Name box.
-
Select the record set owner in the Owner box.
-
(Optional) Type a note in the Note box.
-
Select SAVE.
To add patrons or items to an existing record set
- On the Pick List view, select the patrons or items that you want to add to an existing record set.
- From the Actions list, select one of the following:
- Add to Existing Patron Record Set
- Add to Existing Item Record Set
- Search for the record set that you want to add the patrons or items to.
- Select the record set from the search results, and then select OPEN.
- (Optional) Type a note in the Note box.
- Select SAVE.


