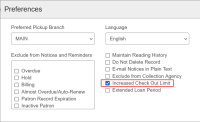
Setting up Increased Check-Out Limits
The process of setting up increased check-out limits involves configuring settings in Polaris Administration (staff client) at both the system and branch level and enabling the option in Leap for individual patrons.
To set up increased check-out limits
-
In Polaris Administration (staff client), go to Administration Explorer > System > Profiles.
-
Select the Staff Client tab.
-
Locate the Web App: Suppress Field: Increased Check-out Limit profile setting. This setting displays the Increased Check Out Limits checkbox in Leap, which library staff use to enable this feature for individual patrons.
-
Change the value to No.
-
Select Save.
Note:
You must have the Modify increased check-out limits: Allow permission to complete this section.
Configuring increased check-out limits for a branch involves setting two branch-level settings. Before you begin, however, you might want to determine the base check-out limits currently set for each branch.
-
In Polaris Administration (staff client), go to Administration Explorer > [Branch Name] > Parameters.
-
Select the Patron Services tab, and locate the Check-out: Increase Total Item Limit parameter. This parameter defines the number of items a patron can check out in addition to the total item limit defined in the Patron/Material Type Loan Limit Blocks policy table.
-
Enter the number by which you want to increase total check-outs.
-
Select Save.
-
In Polaris Administration (staff client), go to Administration Explorer > [Branch Name] > Policy Tables > Increased Check-out Limits.
This table allows you to specify which material types can have increased check-outs. When you enter a value in this table for a specific material type, the system adds this number to the maximum item limit defined for that material type in the Patron/Material Type Loan Limit Blocks policy table. If a material type does not appear in this table, then no increased check-outs are allowed for that material type.
Warning:
Both Increased Check-out Limits policy table and the Check-out: Increase Total Item Limit parameter above must be enabled for this feature to work properly. -
Select Insert
 .
. The Insert: Increased Check-out Limits dialog appears.
-
Select a material type from the list, and enter the number of increased check-outs allowed.
-
Repeat the last two steps to add additional material types.
-
Select Save.
You must have the Patron privileges: Modify permission to complete this section.
-
In Leap, use the Find Tool to find the patron.
-
Open the patron record, and select Registration.
-
Select the Preferences tab on the left side of the screen.
-
Select Increased Check Out Limit.
-
Select Save.

