Combine Serial Issues
You can combine issues of a serial using the Combine Issues button on the Serials Check In workform.
Tip:
If the publication will regularly include this combined issue, modify the publication pattern.
For the permissions needed to work with serials and standing order parts, search the Polaris online help for "Serials Workflow Permissions."
You can combine issues, but not standing-order parts. The two issues must be linked to the same publication pattern to be combined. If they are not linked to the same publication pattern, an error message appears, and the issues are not combined. Issues with the following status also cannot be combined:
- Received
- Claimed
To combine serial issues
-
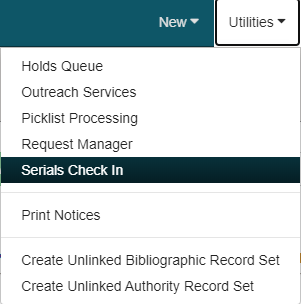
Go to Utilities > Serials Check In.

The serials Find Tool opens. - In the Find Tool, type the title of a serial.
-
Select a result, and select Open. The Serials Check In workform opens.
-
Select two issues in the issue list by selecting the checkboxes to the left of each issue.
-
Select Combine Issues.
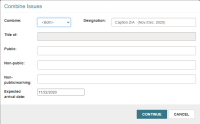
The Combine Issues dialog appears.
- Select or type information into the fields as described:
- Combine: Select one of the following options:
- Chronology to list the lower of the two volume numbers for the combined issue, and list the expected dates of each issue separated by a slash.
- Enumeration to list the volume numbers of the issues with a slash to separate the two numbers, and list only the first of the expected dates.
- <Both> to list the volume numbers of the issues with a slash to separate the two numbers, and list the expected dates of each issue separated by a slash.
- Designation: Shows the possible volume number and date of the combined issues depending on what option you select in the Combine list. You can change this text if needed.
- Title of: You cannot edit this text.
- Public: Enter an optional public note.
- Non-public: Enter an optional note for staff.
- Non-public/warning: Enter an optional warning for staff.
- Expected arrival date: Defaults to the earliest of the two arrival dates. You can change this date if needed.
- Combine: Select one of the following options:
-
Select Continue.
A message appears to tell you the issues were combined successfully.
Note:
The new issue has the status of Expected only if both combined issues each had the status of Expected. If the two combined issues have Expected and another status, the combined issue will have the non-Expected status.

